Saturday, April 16, 2011

A Market Skirt

Photobucket
For several months I've had a tutorial for a pretty skirt bookmarked. I would open it, ooh & ahh and then close it with a sigh. I was intimidated.

Photobucket
Photobucket

This week I picked up some pretty white cotton and eyelet fabric and tackled the skirt. I wish I had made one sooner. It was super easy, all straight lines and very clear directions. It also made me want to buy a serger so I can have pretty finished seams. For now I want to practice french seams so I can still have pretty finished seams.

Photobucket
I want to make a matching skirt for Delilah, a couple more for Lydia and maybe one for myself. There is an option to add pockets and I'm going to do that. She was just too excited to wear it and that put a smile on my face. :) If you want to make a pretty skirt like this you can find the Market Skirt tutorial here.

Thanks for visiting!

Linking to:


sew many ways

Friday, April 15, 2011

Argyle Freezer Paper Stenciling

Have I mentioned my {love} of freezer paper stenciling lately?

Photobucket

I really do love it. It's faster than sewing on appliques and these days I appreciate a quick project. I saw a tutorial for an argyle shirt similar to the one I made but I can't find it to link to you. It's not in my bookmarks and didn't come up on a google search. If you happen to know the blog post I'm talking about please let me know so I can give credit to the idea and share what I was inspired to do. :)

Photobucket Photobucket
I thought wrapping the argyle around to the back would be fun.

Quick Notes Tutorial {Sorry no pics as I was going to link the other one for you}.
  • Find a solid polo {or tee}
  • Print out an argyle image {Google Images brought up a few}
  • Trace onto freezer paper and use a paper trimmer or straight edge & exacto knife to cut.
  • OR skip the two steps above if you have a Silouhette to cut the design straight onto freezer paper.
  • Arrange your argyles & iron on. This time I only ironed on where I wanted it to stay black, next time I'll iron them all on and peel the spaces I want to paint so they line up better. {you can see several goofs on my shirt}
  • Let dry, apply a second layer of paint if needed {using white on black I needed two, possibly three layers}. Once all is dry peel remaining argyles, put a damp cloth over painted areas and iron to set.
  • Grab a straight edge & taylors chalk {or white crayon} to make lines for sewing.
  • Stitch crisscrossing lines then wash shirt to get chalk or crayon off. I like to hang dry my painted shirts but they do survive the drier also.
I think this would look really cute on a onsie too.  You could make matching dad & son shirts for Father's day or other special occasion. The blog post I got the idea from made argyle shirts for the whole family, this can definitely be done for girls too.
Thanks for visiting!

Linking to:

Serenity Now Crafty Cutter Party

Sunday, April 10, 2011

A Reversible Pinafore {tutorial}

PhotobucketPhotobucket

I shared some pictures of the first pinafore I made over here. I love putting my daughter in a little pinny with this warm weather spring has brought. It's lightweight, airy and can still show off her fluff. I need to make her a matching flower or two for her cute little head. A bonnet would be fun too.

Honestly, I'm a little nervous writing this up because it is my first sewing tutorial. {Ack!} I've tried to make this as 'goof proof' as possible and hope that a beginner would feel confident making something like this. Because they totally can. If there's a step that isn't clearly written out or a picture for a step missing please tell me so I can edit, clarify and add pictures where necessary. Thank you! :)

Gather Supplies
  • Scissors
  • Sewing machine {you could do this by hand but I'd rather poke a needle in my eye}
  • Pins
  • Seam Ripper {hopefully you won't need it but I always keep it handy}
  • Choice of fabrics {I've used less than one yard remnants}
  • Coordinating thread{s}
  • Something to mark your fabric {taylor's chalk, washable marker, pencil or regular ink pen}
  • Pattern {few options for this that I'll explain below}
Pattern Options
  • You can make your own pattern tracing a dress you have {remember to add for seam allowance}. I don't have a picture of this because I don't make my own patterns. If you do this I would fold the dress in half and only trace half, it's easier to get a symmetrical pattern with half a pattern & folding the fabric.
  • You can purchase a store bought pattern. But if you were doing that you probably wouldn't end up reading a tutorial online would you? ;)
  • I searched the 'net  for a pinafore pattern and found this one. This pattern fits my 8 month old with room to grow, you may need to enlarge or shrink depending on the size of your child. It's from this tutorial, the back doesn't criss cross and it's not reversible but another cute option. Print the first two pages, overlap the pages to line up the lines taping together, {print the third if you want a pocket and follow their directions for adding that} and make your pattern pieces like this:

Let's pretend the fabric in the first picture is a paper bag cut to lay out flat. Fold the paper bag and lay the pattern piece on it as shown with the arrows on the fold. Then you'll open up the new paper bag pattern piece then draw & cut lines as shown in the second picture. There is play room here, it doesn't have to be exactly like mine. I like using paper bags for pattern pieces that I'm going to reuse. I can easily write on them, they don't get my hands dirty like newspaper does and I can fold them up easily.

Cut List

1 each pieces A, B & C on two fabrics. If you don't want this to be reversible I would still line the pinafore with muslin or another inexpensive fabric.

PhotobucketPhotobucketPhotobucket

Assembling

1. Lay your pieces of like fabric right sides together, lining up side hems & shoulders.

PhotobucketPhotobucket

Pin both sides together & sew with a 1/4" seam. Remember to back tack at the top & bottom. Do this for both fabric sets.
PhotobucketPhotobucket 

*Quick Tip! If your needle is on set to the middle setting and you line the edge of your fabric with the right edge of your presser foot this will give you a 1/4" seam. Focusing on keeping the edge lined up will help keep your lines straight too, watching the needle always gives me crooked lines.

2. Press! This isn't absolutely necessary but I think it helps in having a more finished piece. And ironing can be relaxing. I press my seams opposite directions so when I line them up it's nice and flat rather than more bulky in one spot. If you iron one piece with seams facing out and the other with seams facing in they will end up lined up like this {after it's sewn and turned}.

Photobucket

3. Now you should have two pieces that look like happy little bats ;) Pin both pieces together right sides facing each other. I start by lining up & pinning each corner, then the seams, then the shoulder pieces and center of curves on the straps. After that I pin between those to keep it all lined up. At the shoulder strap and about three inch space at the bottom I put larger pins sideways to remind myself not to sew there. You want these spaces {marked with a black line} left open for turning later.

*Quick Tip! If one thread won't coordinate with both fabrics use one color thread and another color in the bobbin and pin accordingly so the top fabric matches the top thread and the bottom matches the bobbin.


4. Now it's all sewn together and pins are removed it's time to trim up a couple seams and turn right side out. I like to trim the neck and curves on the inside of straps {B&C}. If you don't trim the seam you'll want to make small cuts {careful not to cut your seam!} at the curves. Either options gives less bulk after it's turned and I think a nicer finish. To turn simply reach in at the bottom and start pulling the fabric out. I like to use a chop stick {they come in some bags of stuffing also} to really push out the corners and curves.

5. Press! I know, again. But it really is necessary this time! Another trick to a more finished product is top-stitching. To get a good top-stitch you want to iron the piece flat, pushing out the seams. Also when you do this tuck in the bottom that you left open for turning about 1/4" so it's lined up with the rest of the piece. Don't top stitch the open end of the shoulders!

Photobucket

*Quick Tip!  I like about 1/8" seam when I top stitch. To get this I center the edge of my fabric under the right part of my presser foot and move the needle to the right. This helps me keep a straight line. {Though I'm still practicing improving this} Your sewing machine should have a setting for this. If it doesn't then line up the fabric accordingly to the needle.

6. Now it's time to assemble the straps. My pictures are going to be opposite of what I tell you to do. I wanted to open the neck a little and doing so trimmed the shoulder piece but forgot to trim the strap piece to match so I had to tuck the shoulder into the strap instead of the strap into the shoulder. And your pieces will be the same size. Either way ends up working.

PhotobucketPhotobucket

Tuck the shoulder about 1/4" in and press, then tuck the strap in about 1/2" and pin together. Remember, the back pieces cross over each other. Sew together lining up your stitch with the existing top-stitch. I back track a couple times. You'll have an opening that you want to sew up as well.

7. Admire your finished product and get it on a cute little girl. Or boy if you must test it out. Just remember to take a picture for the baby book. ;)

PhotobucketPhotobucket

Photobucket

And you may want to go get more fabrics because these are just too simple and cute. I have seem variations with ruffles added across the bottom, between the fabrics, added flowers or buttons, you could embellish with ribbon or ric rac as well. I have also seen some with the straps finished and tied off {though they may need to be longer to do that}. You could also make the neck square instead of rounded.

I hope this tutorial is helpful! If you do make a pinafore using these directions I'd appreciate any feedback and would love to see your finished products!

Note: I'm not adding my "Searching Out Simple" mark on most of these photos so you can see the whole thing clearly but please don't use my pictures as your work or without giving credit. The tutorial I used to make my first pinafore is inspiration for this post but I have added more tips and all pictures are mine.

Thanks for visiting!

Linking to: 

sew many ways


Friday, April 8, 2011

A Winner & A Surprise!

Good morning! I am excited to announce the winner of the 
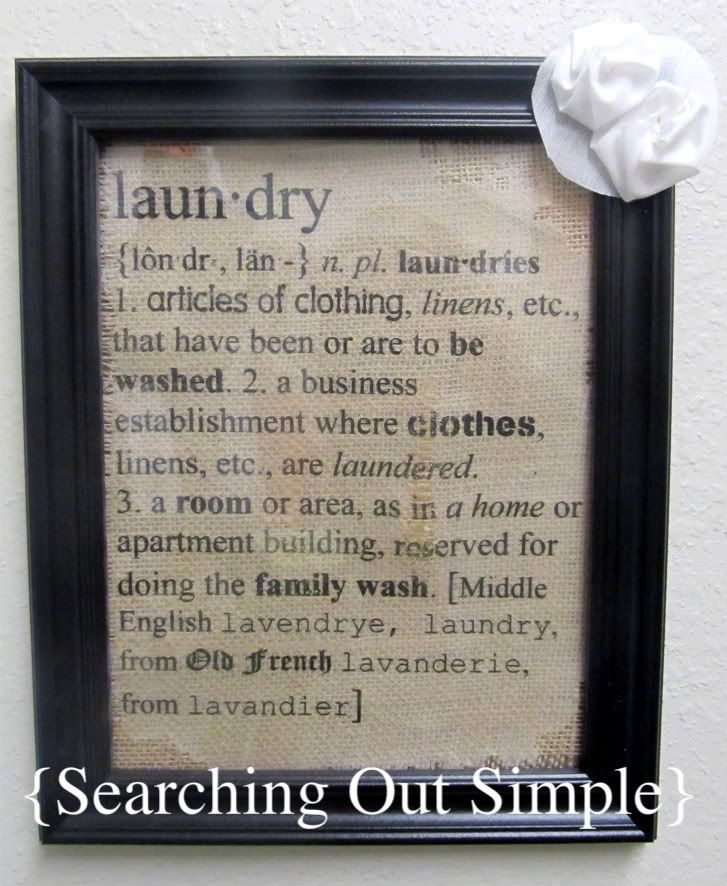
laundry definition giveaway.

Photobucket

I have to say I loved the ideas given to me for the hutch makeover. That puppy will be a new color soon, I'm thinking a shade of blue or green, and there will be something special on the inside. I still haven't decided exactly what that will be but I'm thinking a different color for the shelves and some pretty fabric or paper on the back. The hardware will get a {money saving} new look also. AND my husband has {finally} agreed to paint our table & chairs. Plus he found two freebies so we can all sit together at the table again just as soon as things are painted and recovered.

My favorite April Fool's prank story was the last comment from Moe about taping the sprayer on the sink so when the water turned on it soaked her brother. This is something I'll have to remember for my husband. ;)

I used random.org to choose a winner from the fifteen entries and the winner was: {drumroll}
Nancy! with her comment 
Hutch possibilities: I don't know exactly how you feel about an antiqued look, but I would suggest a white, cream, or pale green or yellow paint with a light stain on top. Because I think the hutch would benefit from some distressing, perhaps a light sanding on edges. Possibly some charming little knobs and handles in a pewter to add to the distressed look a bit.

Nancy :) 

Nancy - please contact me at with a mailing address so I can send your prize. Your profile is coming up as 'not available' so I can't visit your blog to share the news!

If I don't hear from Nancy within the week I will select a new winner, I understand life gets busy sometimes and everyone doesn't check their blogs daily {likesomeoneImightknow}.

And now a surprise for everyone else! You can print this definition to make your own sign. Maybe your printer will print onto burlap {or cotton or canvas} or you can use an iron on or printable fabric or paper. If you make a sign please visit and tell me, I'd love to see your twist on it!

Photobucket
To save image right click and select 'copy image' then paste to a program like Word or Publisher {or Photoshop?, not sure because I don't have that program}

Thank you for visiting!

Linking to:


Weekend Bloggy Reading

Thursday, April 7, 2011

Last Chance for Giveaway!

Hello! Just wanted to drop a quick reminder that you have until 10am CST tomorrow to enter my giveaway here for the laundry definition printed on iron on transfer paper so you can jazz up your own laundry space!

Also, you'll want to check in when I announce the winner because I'll have another surprise. {Fingers crossed it works out!}

Monday, April 4, 2011

Reversible Pinafore

This is a project I made about a few weeks ago but haven't shared yet. I saw several of these on a crafty forum I participate on and finally tried it out. It was a pretty quick and easy project.

Photobucket

At the time my camera was out of commission so I used my cell phone to take a picture. This is one side. I got the fabric from an end of bolt sale at Above All Fabrics. It's hard to see in this picture but the back criss crosses.

PhotobucketPhotobucket

And this is the other side, fabric purchased from the same sale. This picture was taken yesterday while we were out at a park. She's grown so much already. :happy/sad: I love dressing her in this. I can choose a cute diaper to coordinate, or add bloomers {if I had them}. It can be worn any season if you add a shirt underneath or a cardigan.

Yesterday was the first day I put a little 'ponytail' in Delialh's hair. It's a teeny tiny thing.

I am going to make at least one more of these and thought I would take pictures for a tutorial as I go. This isn't my original idea or pattern but I made some slight changes to the one I worked from. Would there be any interest in this?

Thanks for visiting!

Linking to:


Related Posts Plugin for WordPress, Blogger...